Finally decided to play around with Studio 4.9 and Genesis, and give V4 and Poser 11 a little rest. My question is this - in Poser, I can change the expression on V5 and S5 faces, but for the life of me, cannot figure out how to do that in Studio. There's nothing in the Parameters tab, and I can't find anything in any of the other tabs. What am I missing, and where? Did I somehow click on a setting and foul everything up? Do I need to uninstall and reinstall Studio? Or is the problem with the Genesis figure?
↧
All right, I give up
↧
figures load without materials in DAZ Studio 3
When I load a figure in DS 3, such as Victoria 4.2, it loads without mats. When I apply a mat, it is barely visible.
↧
↧
Turn shadows off on multiple objects with less clicks?
I have a scene with like 100 objects. Please tell me there's a way to turn shadow casting off on all those objects quickly in very few clicks and I don't have to go through every single object and do it in 100 clicks.
↧
Trouble with Autofit cape
I'm trying to get RPublishing's Chaos seed working on a Genesis 2 female.
Most of the outfit works fine, but I'm having some trouble with the cape. The images below shold show what I mean. after using autofit, the parts that are supposed to hang, stick outwards instead.
Can anyone privide suggestions on a fix?
I've tried following Sickleyields tutorials and used the Transfer utility instead, but with no success. I've also tried using 'Sickle Rigging and Morphing System', but similarly, with no sucess.
↧
Iray, Strong Rim Lights, Bad Leg Shading
I've been doing more renders with strong side and rear rim lights. The lights are spots placed at a distance (maybe 3-8 meters), and turned up quite high. To avoid the stark transition in shadows, I've change the emitter size from Point to a plane geometry, typically a disc with a diameter of 10cm to 20cm.
What I've noticed is that (almost?) without fail, the rim causes the leg texture to appear differently than the torso or other parts. By different, the torso usually has the planned appearance of surface sheen, but the leg texture does not. This results in an obvious transition border between the two textures. It mainly happens on the side "opposite" the rim -- that is, if the rim is on the right, it's the character's left leg that is affected, as that leg is more likely to have direct rim light falling on it.
I've verified it's not just an issue with the textures themselves. The surface settings are the same for all of the skin textures (except for the maps of course), and the problem does not appear when the rim light is removed, or turned way down. I tried it on numerous characters from different sources, including the stock V7 maps, and it's there. I'm using the latest 4.9 public beta/release candidate.
Anyone else seen this? Is there a known fix? I was thinking maybe it had to do with the orientation of the map, but both torso and legs are vertically oriented. Perhaps its the way the UVs are done.?
↧
↧
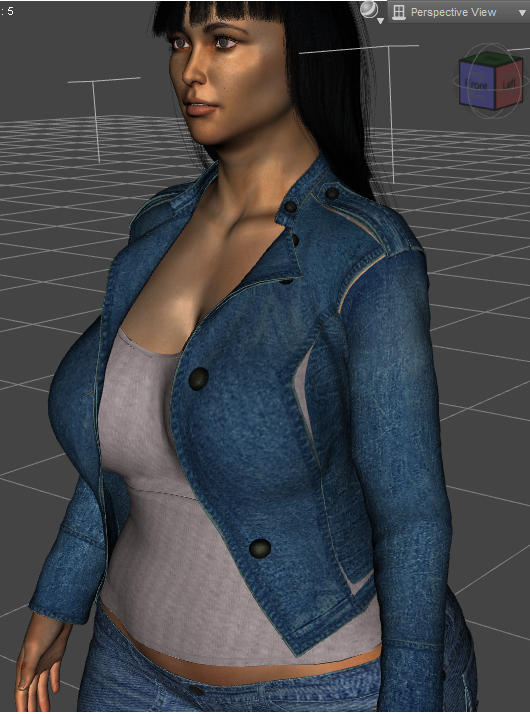
Mesh Smoothing 'unstitched' the jeans jacket at the seems
I have bought "Hongyu's Cowgirl 3 for V7". I find it nicely modelled and it has well made textures. BUT... when I try to use mesh smoothing with smoothing iterations higher than around 5 the parts of the garment start to looking 'unstitched' (please see attached example with smoothing iterations of 30).
Other clothes I have bought do not have that behaviour. But maybe there is a function, which could mitigate this effect. (E.g. I changed the parameter 'Smoothing Type' from 'Base Shape Matching' to 'Generic'. That works fine and the jacket does not look unstitched anymore, but the smoothing effect is very small and not really what I want.) Or is it simply as designed and the artist has not considered mesh smoothing?
Thanks.
↧
Is export FBX with morphs broken with GF3 / V7 ?
I'm having major issues exporting V7 to 3ds Max.
If I export without morphs everything is fine, as soon as I export with morphs my animation is trashed.
In max I get these extra files, and some weird entries in the morpher modifier with crazy values.


I've spent days prepping for an animation project amassing all the morphs I need and this has truly dropped me right in it.
I read in another thread this was an issue and I couldn't find any resolution.
I've tried all version of FBX in both DS and Max and all give the same result.
Can anyone confirm either way what the situation is?
thx
↧
TUTORIAL - Creating a Genesis/G2F/G2M/G3M/G3M Full Body Morph for DAZ Studio Pro 4.6 by RKane_1
Okay, this is a repost from the old forums but I thought it would be helpful to put here. It is not as illustrative because you cannot post multiple pics in order anymore in the new forum (or I have not mastered that trick) so I placed the links to the images there for you.
Enjoy!
Creating a Genesis/G2F/G2M/G3F/G3M Full Body Morph for DAZ Studio Pro 4.6 by RKane_1
with GENEROUS assistance (They wrote most of it and I copied it from the DAZ forum where we had this discussion) from josephquick & RAMWolff and finally, last but not least, Richard Haseltine whose the author (I think) of the original document that can be found here: Tweaking A Figure Skeleton for a Custom Shape (WIP)
For this Tutorial, I used :
• DAZ Studio 4 Pro or higher
• Hexagon 2.5 (or some other modeller such as Blender or ZBrush, which is my favorite)
Both DAZ Studio and Hexagon were gotten for free during the giveaway that DAZ had in February through April of 2012 but the cost currently is uncertain.
Exporting and Modelling Genesis
1. First make sure Genesis is at its lowest subdivision level and in its zero position. In the Parameters Tab, go to the little menu icon in the top corner -> Zero -> Zero Figure to instantly remove all poses and shaping modifiers to your figure.
IMPORTANT NOTE ABOUT EXPORTING G3F AND G3M: HI! :) If you zero the figure before you export, it will remedy this but, just so you know this is very important. Before you export either G3F or G3M, turn off the Mouth Details Morph and the Navel Morph. To see what I mean, load either G3F or G3M. Go to the base figure in the Scene Tab and then, in Parameters, select "Currently Used". Now, even though you haven't touched your figure dials yet, you will see two dials turned up to 100%: "Mouth Realism HD" and "Navel". Turn both down to zero before you export your figure and this will rectify issues you will have otherwise with your final morph.
There is also a VERY good tutorial on correcting these if you have already made a few morphs WITHOUT changing these, Cleaning Up Morphing Mistakes by Xenic101

2. Export Genesis out as a .obj file in DAZ scale.
3. Open the Genesis.obj file in your modeling app. (In DAZ Studio Pro, you should be able to just go to File>Go to Hexagon and these first three steps will be done for you if you are Using Hexagon. Same for Go to ZBrush for ZBrush users.)
http://i20.photobucket.com/albums/b238/RKane_1/DAZStudio4Pro/DazTutorials/03_SendToHexagon.jpg
4. In the modeling program you've chosen, change the figure to your heart's content BUT DO NOT change the total number of Vertices. This means do not subdivide and leave it subdivided or use any tools which add vertices to your model. It must remain the same number of vertices from export to import.
In Hexagon or ZBrush, there are certain tools that will add vertices. This is a no-no as it will prohibit the object from being imported as a morph and make it so your morph won't... well... morph.
In Hexagon, you should be safe with the simple tools that modify Scale, Position, and Rotation as well as Bulge, Smooth, Pinch, Bloat and my favorite Tweak. Never change the Subdivision levels permanently. If you are doing a morph that will change both sides of the Mesh in the same way but mirrored, you use the Symmetry function on the "X" axis.
Zbrush has a very rich palette of tools as well, moreso than Hexagon however the cost is much steeper. Most of the brushes will work fine without any issue.
In this example, I have lengthened the palm of Genesis for some monkey like hands I wished to make.
http://i20.photobucket.com/albums/b238/RKane_1/DAZStudio4Pro/DazTutorials/04_ModellingInHexagon.jpg
Returning Genesis back to DAZ Studio
5. Export the model making sure to utilize DAZ scale (If you have Hexagon, use File>Go to DAZ Studio or, if you have ZBrush, the GoZ bridge should be there as well for you) and bring in the model back into DAZ Studio. If you have Hexagon and the Hexagon Bridge, this is an easy step. After making your changes in Hexagon, you simply to go to File-> Send to DAZ Studio, though you may wish to save your work In Hexagon for use in the future.
With ZBrush, the same information applies.
http://i20.photobucket.com/albums/b238/RKane_1/DAZStudio4Pro/DazTutorials/05_SendToDAZStudio.jpg
6. Apply the model as a morph to the Genesis figure that usually loads when opening DAZ Studio 4. In the Morph Loader Pro box presented, you can change the name of the morph by clicking on the name "Morph" and choosing a more descriptive name for the morph. In step #15, it will be helpful to name your morph something with an odd letter that is not often used as it helps locate the morph in the ERC freeze stage because you have to scroll through each individual morph that Genesis contains so, word to the wise, steer clear of "J", "M", and "V", if at all possible. (Helpful Hint: Use a dash "-" to start the name of your morph. You can always chage it later and during the ERC Freeze portion of the tutorial, it will be very helpful and quick to find your morph.)
If you are NOT using a bridge, you will need to open Morph Loader and then locate the .OBJ file you intend to use as your new morph after opening DAZ Studio 4. THEN follow the directions above.
http://i20.photobucket.com/albums/b238/RKane_1/DAZStudio4Pro/DazTutorials/06_CreateMorph.jpg
http://i20.photobucket.com/albums/b238/RKane_1/DAZStudio4Pro/DazTutorials/06a_CreateMorph.jpg
You should get the following message after you click "Accept"
http://i20.photobucket.com/albums/b238/RKane_1/DAZStudio4Pro/DazTutorials/06b_CreateMorph.jpg
and then just click "OK".
7. Go to the Parameters tab and turn your Morph on to 100%. in the Parameters Tab, you should find it under morphs if Genesis is Selected. If you used Morph Loader Pro, then it will be under that heading. If you are simply doing a cosmetic morph where the rigging is not changed, you are pretty much done and can skip to step #17. You can save the morph and be done by saving the figure. If, however, you have completed a morph that changes the Rigging on the Genesis Figure, a little more work is needed. I will still go through these steps as you never know when you may have modified a figure and accidentally moved the wrong vertices. You don't want to find that mistake down the line after doing all these other steps.
Adjusting Rigging to Shape
8. Select the Joint Editor tool from the Tools pull-down menu at the top left section of the DAZ Studio 4 Pro screen.
http://i20.photobucket.com/albums/b238/RKane_1/DAZStudio4Pro/DazTutorials/09_JointEditor.jpg
9. The rigging of the figure should now be visible.Then bring up the Tool Settings tab.
http://i20.photobucket.com/albums/b238/RKane_1/DAZStudio4Pro/DazTutorials/09a_JointEditor.jpg
10. Click the thing up in the left hand corner of the tab or Right click on the bones (really anywhere on the figure) and choose "Edit > Adjust Rigging to Shape" option.
11. Make sure the last option "Adjust Orientation" is clicked so that an orange check-mark appears there and click "Accept".
12. A Dialog A dialog box Calculating Mean Value Weights will appear and finish loading. The next step is to do the ERC Freeze to the new rig shape especially if you are saving it as a DSF or DUF file or the rigging will convert back to the original rigging....
ERC Freeze
13. In the Parameters tab, you will need to be in Edit Mode which you can get to in the Display Options menu in the Parameters tab.
14, Once in Edit Mode, right click on your morph in the parameters pane and select "ERC Freeze..." In the ERC Freeze Option Box that appears. Figure node and Property should be auto-populated (THANK YOU, DAZ!)
15. UNCHECK the "Restore Figure Rigging" check box. That is VERY important or you will have to start over.
16. Click "Accept"
If you have not updated recently, the old instructions are as follows for 4.5 or less.If you can't find the Property Editor Tab, that is a clue that you haven't updated yet. If you are this far and had no problems, skip to Placing your Morph in the Hierarchy section below
13. In the Property Editor tab, right click on the name of Genesis in the Hierarchy section and click ERC Freeze.
http://i20.photobucket.com/albums/b238/RKane_1/DAZStudio4Pro/DazTutorials/14_ERCFreeze.jpg
14. In the ERC Freeze Options dialog box, select Genesis for Figure and Node should auto-populate.
http://i20.photobucket.com/albums/b238/RKane_1/DAZStudio4Pro/DazTutorials/15_ERCFreezeSettings.jpg
15. Now, click on the Property bar and on your keyboard, type the first letter of the name of your morph from step # repeatedly until you find the name of your morph. (Yes, this can take a while, unless you followed my hint and used a dash "-" at the beginning of your morph name). If it's not there then you will need go back and save it out as a new DSF or DUF file and do it all over again which means going back to step #6
http://i20.photobucket.com/albums/b238/RKane_1/DAZStudio4Pro/DazTutorials/16_ERCFreezeSettings2.jpg
http://i20.photobucket.com/albums/b238/RKane_1/DAZStudio4Pro/DazTutorials/16a_ERCFreezeSettings2.jpg
16. DO NOT CLICK ACCEPT until you UNCHECK the "Restore Figure Rigging" check box. That is VERY important or you will have to start over at step #14.
http://i20.photobucket.com/albums/b238/RKane_1/DAZStudio4Pro/DazTutorials/17_ERCFreezeSettings3.jpg
Placing your Morph in the Hierarchy
17. To place your morph in the appropriate place so that you or others in future can find it in the shaping or posing tab, go to the Property Editor Tab and find your morph. It will be in one of the folders title "Morph" depending on how you brought it into DAZ or it may be in the main Morph file. If you used ZBrush and the GoZ interface, then it will be in a folder titled "ZBrush" Most others are in a folder titled "Morph".
18. Right click on the the name of your morph. This is also a good opportunity to change the name of your morph if you like by right clicking on the morph and selecting "Label". This will change the name of the morph as it shows to you and others in the Shaping or Posing Tab. You may also change the items you may have forgotten to change in the presentation editor earlier such as Minimum and Maximum value and whether your morph should me measured by value or percentage. This info can also be changed by clicking the little gear icon in the Parameters or Shaping tab at the top right side of the morph and then clicking "Parameter Settings".
19. Before grouping your morph in the Hierarchy, make sure you know the exact location where the morph will be as you will be confronted with a lot of options. Just choose what you feel is most logical. right click on the name of the morph as before and now select Grouping. A large window will open and out of this list, you need to find the intended folder you want to put your morph in.
Determining if Auto-Follow is needed on your Morph
20. Auto-Follow either makes clothing and hair that is Auto-Fitted to your figure change according to your morph too.. When Auto-Follow is on, the morph will also change clothing and hair and props auto-fitted to the Genesis model. This can, however, change nearby props in an unwanted way such as a ripple in the hair if there is a morph on an eyelash and the hair drapes the face. The nearby eyelash morph will skew the bangs that are over or near the eye. For minor facial morphs that don't really change the shape to a major degree, then Auto-Follow is not necessary, but if your morph was extreme enough to warrant using Auto-Adjust Rigginbg to Shape and ERC Freeze, then it is likely that turning Auto-Follow on will be required.
To turn Auto-Follow on or off, you need to right click the morph in the Property Editor and then choose the menu item "Auto-Follow"
Saving your Morph as a Support Asset Morph file
21. Turn your morph to zero before saving. If you do not, every time you load Genesis, it will load with that morph on.
22. Under the File menu, choose Save As→ Support Asset (at the bottom) -> Morph Asset(s) File…
http://i20.photobucket.com/albums/b238/RKane_1/DAZStudio4Pro/DazTutorials/18_SaveAs-SupportAsset-DSFMorphFile.jpg
23. Enter your name or company name as the Author Name and a unique name for this morph as the Product Name. Future morphs you can save under this same name if they are grouped together, as this is the name of the folder under your My Library -> data -> DAZ3D -> Genesis ->Base -> Morphs -> (name of the author) -> (name of the file you just made) folder. (For G3F it is My Library -> data -> DAZ 3D -> Genesis 3 -> Female -> Morphs & for G3M it is My Library -> data -> DAZ 3D -> Genesis 3 -> Male -> Morphs)
http://i20.photobucket.com/albums/b238/RKane_1/DAZStudio4Pro/DazTutorials/19_SaveAs-SupportAsset-DSFMorphFileSettings.jpg
24.Click open the Figure Properties hierarchy and find your morph. If using ZBrush, it will be under the ZBrush heading. Likewise for Hexagon. Morphloader will load it under Morph menu. click the check box next to it. Do not check the body parts, just the morph. CHECK YOUR MORPH AND YOUR MORPH ONLY. Then Click "Accept".
25. You are done saving your morph. Now it will show up whenever you open a fresh Genesis and can be distributed!
Any input you give is helpful.
Please feel free to ask question about this and the process here in this forum post.
Common problems
"When I save a morph, the base Genesis loads with the morph applied 100%. It’s no big deal to Zero the Character, just an extra step. But is there a way to Fix this ??"
Yes, Open Daz and zero the figure, the go to save the morph again in a zeroes state. When you save a morph with it on, it will autoapply it everytime when you open up the Genesis figure. If you save it in a zeroes state, then you won't have to.
Also, mjc1016 added a way to do it in a text editor if you prefer just a few posts down.
"My morph seems to change nearby clothing/hair in an unwanted way. OR Clothes don't change when I morph them."
Auto-Follow may be on an undesired setting. When Auto-Follow is on, the morph will also change clothing and hair and props auto-fitted to the Genesis model. This can, however, change nearby props such as a ripple in the hair if there is a morph on an eyelash and the hair drapes the face. The nearby eyelash morph will skew the bangs that are over or near the eye.
To turn Auto-Follow on or off, you need to right click the morph in the Property Editor and then choose the menu item "Auto-Follow"
Thank you for reading my tutorial.
TERMINOLOGY
I didn't write this. This is stolen LIBERALLY from posts I cut and paste together in an effort to understand and parse the information together in an easily understandable set of info. The posts originally come from Syrus83227_202e840f4e, Richard Haseltine, Herald of Fire, Sickleyield, Ramwolff, and many others here too numerous to name.
"If I have seen further, it is by standing on the shoulders of giants." - Bernard of Chartres. (English Version - Isaac Newton)
I humbly ask all those who know a good bit to read over and correct any assumptions made by either me or the previous parties in an effort to further understanding of this great tool. Thanks! :)
Auto-Follow: "Auto-follow On" tells DAZ Studio to create a morph in conformed figures when the morph in the base figure is dialed up (if there isn't one already). This allows conformed items like clothing to change to conform to the shape of the new figure. Leaving it Auto-follow off will prevent DAZ Studio from creating this automatic morph. Auto-follow should be on when it will make sense for a conformer to try to mimic the morph in the main figure, and off when it won't. You'd probably want to turn it off for something that shouldn't be mimicked by clothes or hair - eyelash morphs, for example. Hair problems have often occurred with eyelash or ear morphs. Eyelashes shouldn't be set to Auto Follow on as a general rule, ears are harder to judge. There are many reasons you might decide either way - for example, the clothing cleavage modifier on Genesis uses two actual morphs for each visible morph (a hidden one linked by ERC to the visible one); one morph, with Auto-Follow on, fills in the space between the breasts and the clothing follows, while the other, with Auto-Follow off, undoes the effect on the base figure while leaving it active in the clothing.
Adjust Rigging to Shape: Adjust rigging to shape moves the end points of the bones so they line up with the same bits of mesh as they do in the base state. When a morph reshapes the body to the point that the rigging doesn't work, the Adjust Rigging to Shape moves the points about which the joints turn so that they are once more inside the mesh at about the equivalent point - though in some cases that may need a bit of manual adjustment. An ERC Freeze is needed to link the moved joints to the morph, so that when it is off the joints are in the normal position and when it is at 100% they are moved to the modified position (and when it's at half strength they are moved half-way). You need an Adjustment Rigging to Shape and ERC Freeze only if the shape has changed sufficiently that the default rigging does not work, and the freeze should link only the change joint centers as controlled properties of the morph slider. If you have unwanted ERC links you can find and delete them in the Property Editor.
ERC: ERC stands for Extended Remote Control. It's basically a way to make one dial control multiple dials, but it's also a little more advanced than that in DAZ Studio since you can also get it to deal with changes in the figure skeleton on top of premade dials.
ERC Freeze 'Freezes' the current figure pose into an ERC channel. This allows you to set your dials the way you want them to be when your new ERC dial is at its maximum and then use the ERC Freeze to create a new dial property. When zeroed, those same dials will be at their defaults (usually also zero). When at maximum, those dials will be at the limits they were set to previously. The best part about this is that DAZ handles the 'in between' parts as well, so that you can have a 50% dial spin which puts those dials at the middle-ground between zero and their ERC setting. ERC Freeze, by default, links every changed property to the one you set as master. That's why it is important not to have anything set that you don't want linked, though you can (and should) run your eye down the list and deselect anything that is included in error.
It's used for a variety of things. The Basic Child morph on Genesis, for example, uses it to scale the figure down to a child size. The actual child morph would otherwise be an adult-sized toddler! It also reworks the bone structure to match the new figure size dynamically.
If your joint settings are not in their memorized base state then ERC Freeze will see the differences between base state and memorized state as part of the changes it should be linking to the morph, and when it restores the figure it will restore it to the memorized state not the actual state on load. You must memorize rigging before using these features.
You can access the ERC-Freeze command in the "Parameters" tab if you change to "Edit Mode" in the right-click menu. Then if you right-click on any property in "Parameters" tab the menu shows many other useful commands and you can see the "ERC-Freeze" in there.
ERC-Bake: ERC-Bake is the opposite of ERC-Freeze. If a Morph or Pose dial is "ERC-Freeze"ed and has "sub-components" that need to change, it can be reversed by using ERC-Bake. It will delete all the sub-components of that property and make them "currently used“ property values again in parameters pane (unfreeze) so they are easily editable there and can be "ERC-Freeze"ed later. If done with more than one control property all the sub-components these are now "currently used“ can be combined with ERC-Freeze to a new property.
ERC-Bake can be found in the right-click menu of that new property in the Property Hierarchy tab - so the "sub-components" gets deleted from that new property and become "currently used" property values again.
↧
Toon Nursery renders very slowly
So, I just got this product:
https://www.daz3d.com/toon-nursery
and it renders very slowly. I would place in 2 characters that in a different room scene with the same lighting scheme would render in about 10 minutes. I put them in the toon nursery, and it takes 40 minutes. My video cards are all at 99% throughout the render at full power. I tried decreasing the room and object resolution to base and turned off reflective surfaces in everything except the windows. I use emissive surfaces for lighting, and the finished renders look fine. Seems like I'm missing something.
Thoughts?
↧
↧
Tutorial *REQUEST* - assigning new Material zones on my clothing creations
I have DAZ Studio 4.9 and ZBrush 4r9.
Would someone who has done it before or knows enough to speculate tell me the easiest way to assign new Material zones on my clothing creations?
I appreciate it very much for all your time and effort. :)
↧
TUTORIAL - Creating a Genesis Partial Body Morph in DAZ Studio Pro 4 Using the DForm Tool by RKane_1
Okay, this is a repost from the old forums but I thought it would be helpful to put here. It is not as illustrative because you cannot post multiple pics in order anymore in the new forum (or I have not mastered that trick) so I placed the links to the images there for you.
Once I get 4.5 working on my system, I will see if it needs updating but if anyone can tell me what has changed, I would appreciate it.
Enjoy!
Creating a Genesis Partial Body Morph in DAZ Studio Pro 4 Using the DForm Tool by RKane_1
with GENEROUS assistance from zigraphix whose the author (I think) of the original document that can be found here: Create Partial-Body Morphs for Genesis - http://docs.daz3d.com/doku.php/public/software/dazstudio/4/userguide/creating_content/modeling/tutorials/pbms/start
Firstly, before you begin this tutorial, it may be helpful to peruse this section of the online manual: D-Form
For this Tutorial, I used :
• DAZ Studio 4 Pro
This was obtained for free during the giveaway that DAZ had in February through April of 2012 but the cost currently is uncertain.
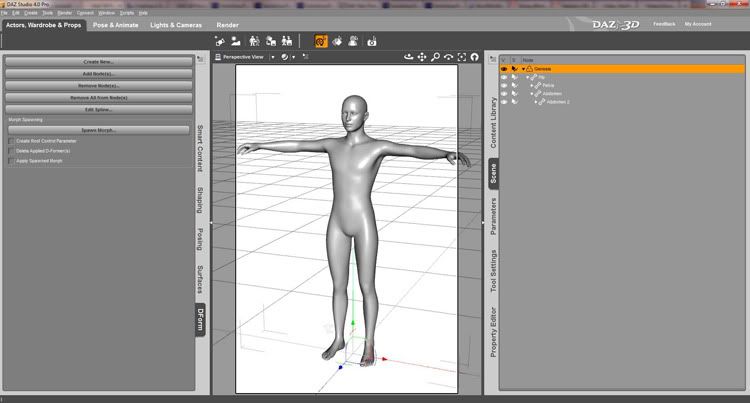
Opening DAZ and load a fresh Genesis Figure
1. Open DAZ Studio 4 Pro and go the the "Smart Content" Tab
2. Under "People", double click on the "Genesis" figure. Even if you intend for the morph to be used on the male or female figure, its best to start with the basic figure here labelled Genesis. You can always use this morph later when you are done on EITHER sex when you are done.
3. Once loaded, you should have Genesis in it's basic "T" pose.
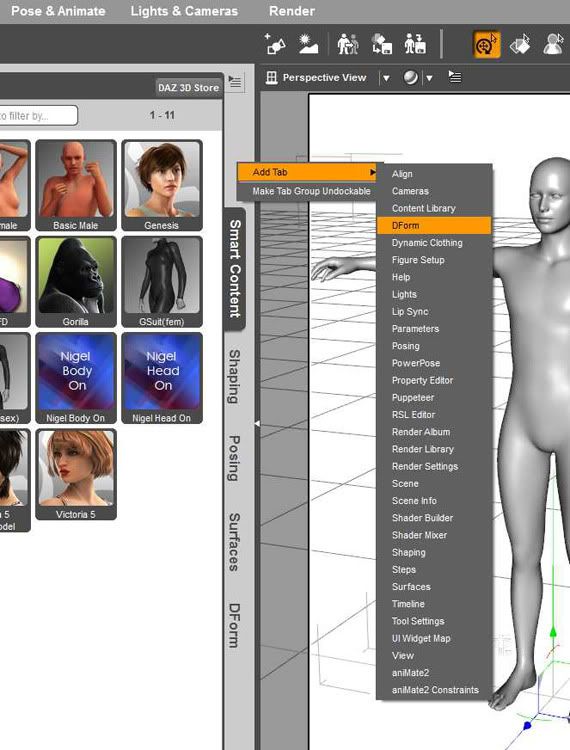
Using a D Former
4. Click anywhere on the Genesis figure or choose the Genesis figure in the "Scene" tab
5. Open the DForm tab.
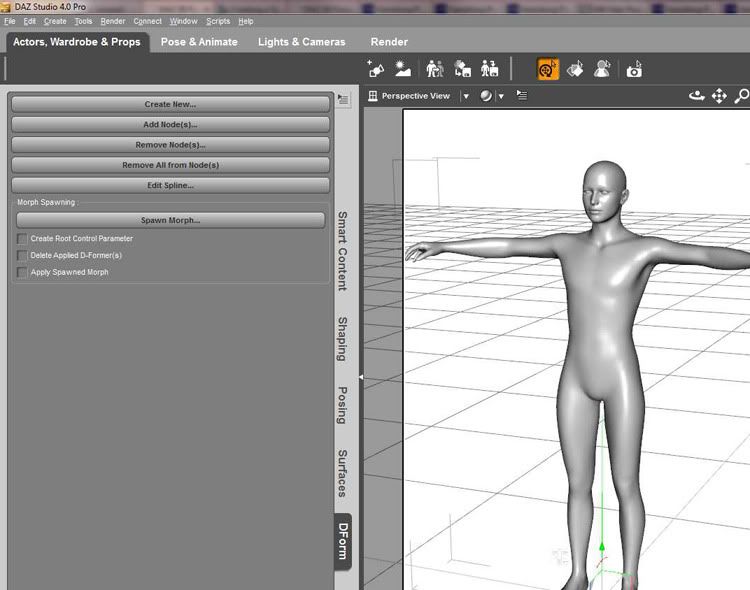
You will find this usually in the "Actors, Wardrobe, & Props" tab somewhere usually on the left side but, if you do not, you can go to anywhere in the grey are where you see the other vertical tabs and right click. This will open a menu where one of the selections is "Add Tab" where you can select "DForm" to add this tab.
6. Click on Create New in the top portion of the DForm Menu.
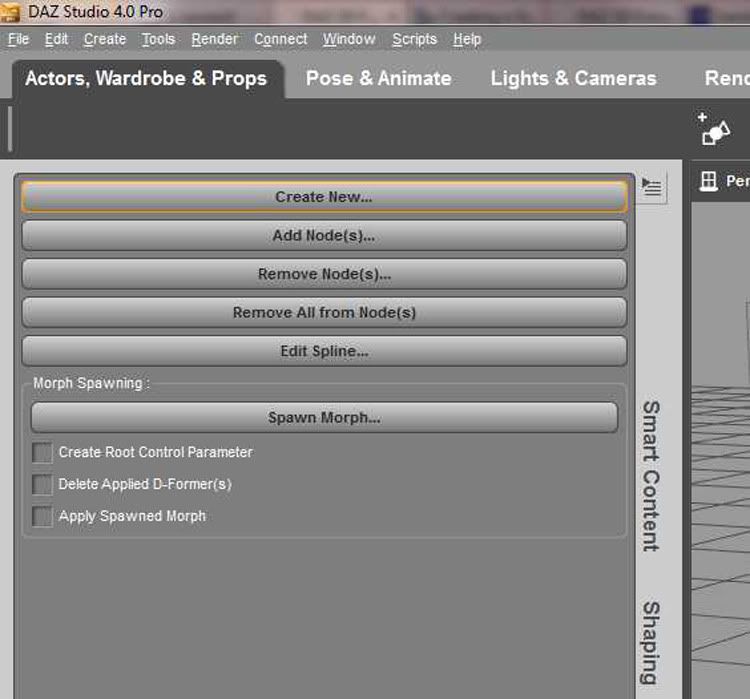
7. Name your DFormer. This can be anything memorable as you may want to save it later in case you want to use it again.
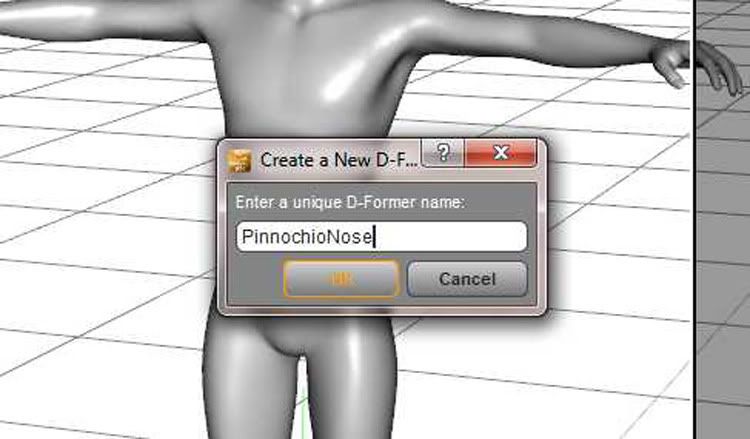
Manipulating the Field, Base, & Handle
8. There are three parts of a DForm: Field, Base, and Handle.
I copied this directly from the documentation because I believes it most plainly and easily describes what is needed to know here for this tutorial.
"The Field appears as a wireframe sphere that surrounds the Base and Handle. The Field determines the size of the area that deforms when you manipulate the Handle. When you create the D-Former, the Field tries to encompass the entire node to which the D-Former is applied. You will likely have to position and shape the field to taste before you manipulate the D-Former."
"The Base looks like a flat, circular disk. It loads into the scene directly beneath the D-Former Handle. The Base defines the baseline point from which mesh deformation occurs when you move the D-Former. Move the Base to where you want the center of the deformation to occur. "
"The Handle looks just like a toy top with a long spindle. It rests on the Base when first loaded into a scene, and is listed as child to the Base in the Scene Tab.
The handle helps DAZ Studio determine how much deformation you want. The further from the Base that you move the Handle, the more deformation will occur.
-To pull the mesh, pull the Handle away from the Base.
-To shove the mesh off to one side or the other, move the translation sliders of the Handle off to one side.
-To push the mesh, push the handle down through the base.
-To twist the mesh, twist the handle along a rotational axis.
-To squeeze or stretch mesh, use the scale sliders.
-To restore the mesh to its original positions and sizes, set the handle’s translation and rotational settings to 0.00 on all three axes, and all scaling to 100%."
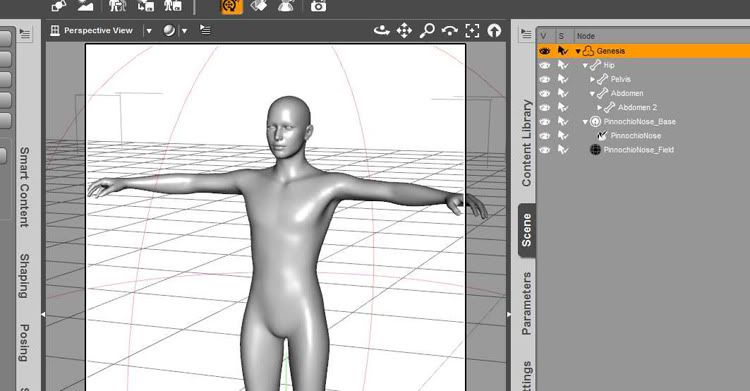
You can manipulate any of these with either the settings in the Parameters Tab or by direct manipulation with the Universal Manipulator but for selection, I HIGHLY recommend using the Scene Tab.
So that you can see all parts, I made Genesis invisible for this shot:
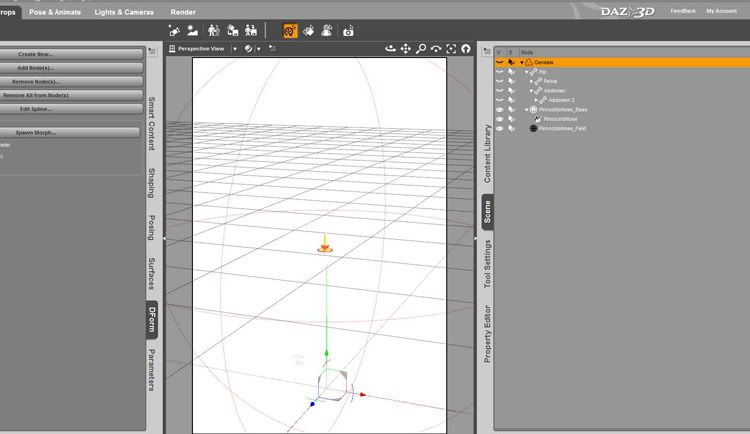
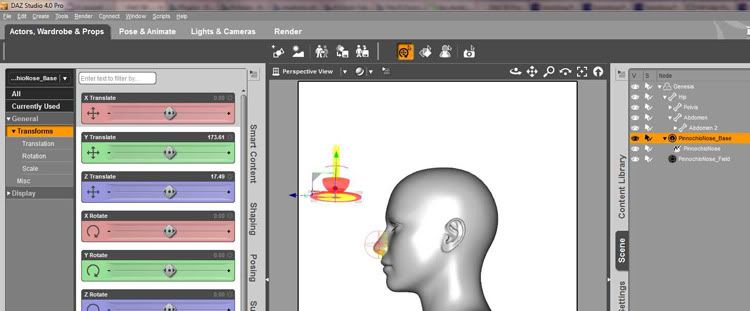
9. Click on the Field in the Scene tab and then, in the Parameters Tab, scale and place the Field so that it covers the area you wish to manipulate. It will be a a VERY large scale at first to encompass the entire figure but if you Scale it to 100%, then it will be a VERY tiny area. Here I have it scaled to 250% and I also used a combination of the parameters Tab and the Universal Manipulator to position it over the nose where I wanted it.

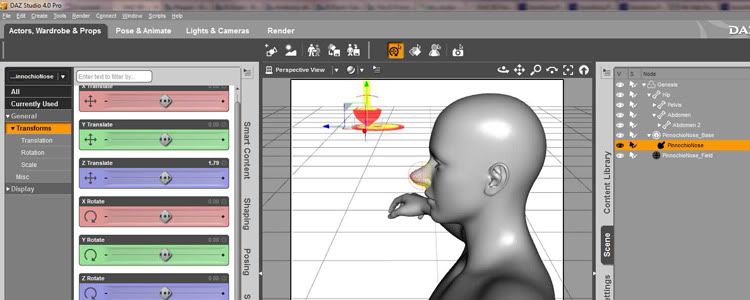
10. Next, in the Scene Tab, click on the base. Now Base Placement can make a difference when using rotate but mainly it should just be placed to where it is visible as what its relative position is usually immaterial.
11. The HANDLE is the key manipulator. Wherever it moves, it will change the shape of what you have selected with the Field in the direction you move with the Handle. Scaling also has interesting effects.
Spawning a Morph From a DForm
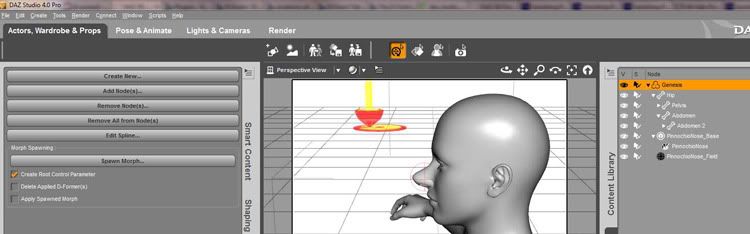
14. Go back to the DForm Tab
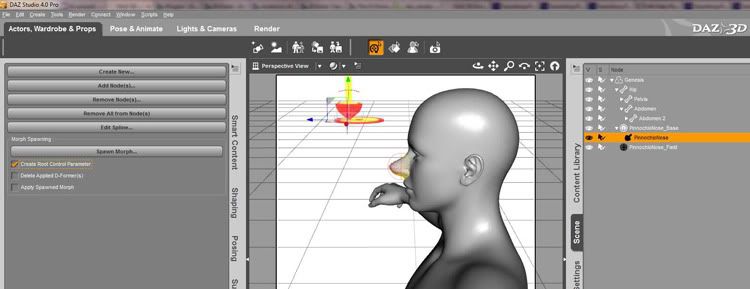
15. The settings here are important. You should always have the "Create Root Control Parameter" box marked off if you want to create a morph from the DForm. In this case, for purposes of demonstration, I will leave the other two boxes unchecked as I don't want to lose the DForm set I've made and I don't want the Morph set to 100% on the Genesis figure afterwards.
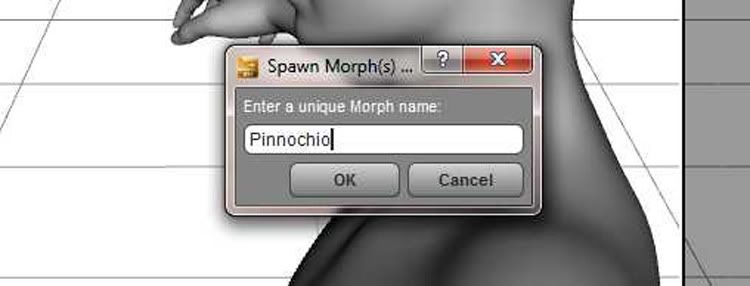
16. Click on Spawn Morph and name your Morph
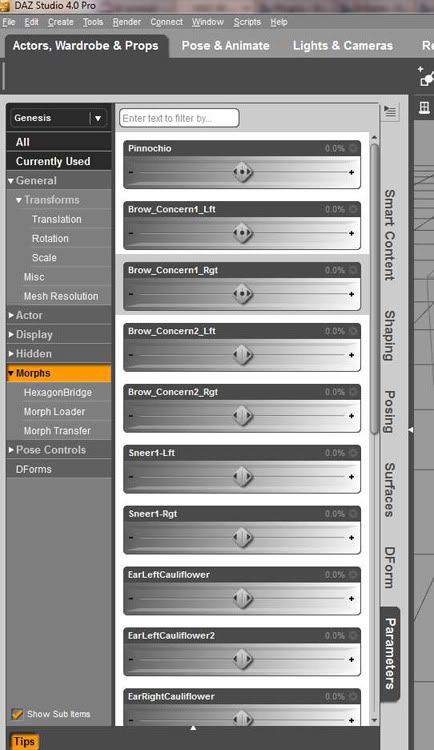
17. You should verify that in the Parameters Tab under "Morph" your new Morph is there.
Saving a DForm Preset
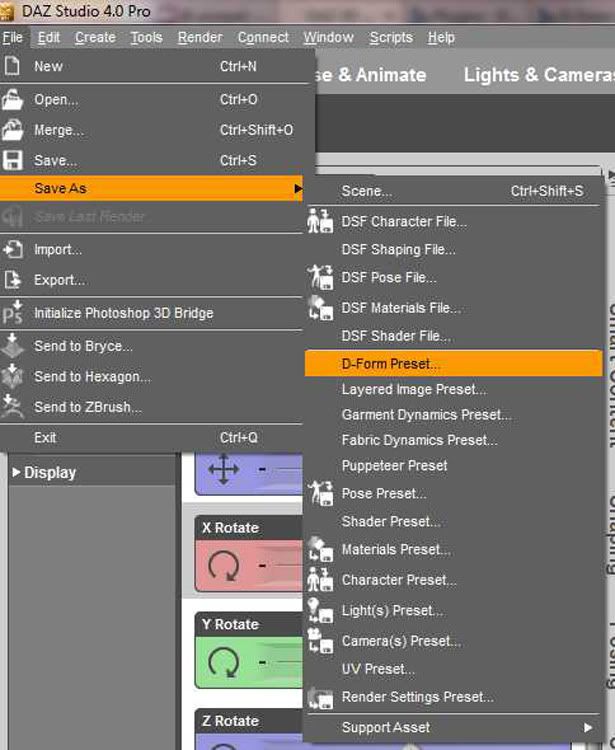
18. So that you can load this same DForm set again if it is ever needed in the future, you can save the DForm as a Preset. Go to File -> Save As -> DForm Preset.
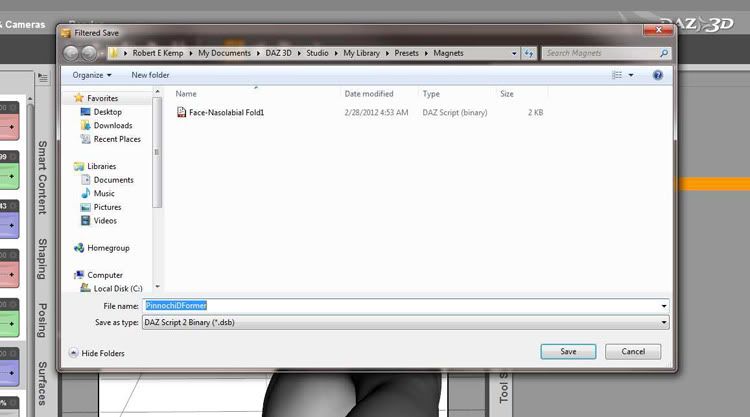
19. When this pane appears, remember you only need to save one single frame. It IS possible to save an animation with a DForm where the DForm follows or changes during the course of the animation but it is unnecessary for making a morph. Also, unless the morph is on an area which will have clothing or jewelry attached to it, then the "Also affect SELECTED Items fit to the Figure" is unnecessary to click on. Though if doing a DForm which will change the chest or torso, it is most likely necessary.

20. Name your DForm Preset.
TO BE CONTINUED...
↧
saving takes an awful long time
hi,
since recently, when i save a scene, after the saving progress bar is done, the windows spinning circle appears and i can't do anything for a couple of minutes, as if the software is still working on saving my scene. i don't have it always, but usually
(it started to appear right after installing another hard disk, which i'm not even using yet, don't know if that has anything to do with it)
any thoughts?
thanks
↧
Content Manager "No Selection"
I am having a problem with content added to the Content Manager. I downloaded all of the free Gen 4 figures back when Daz offered them and have installed them in to Daz Studio 4.5. I then added metadata to all of them and added them to the Content Manager to use with Smart Content.
The problem lies with several of the figures being "unselectable" therefore not filtering the Smart Content for that figure. Victoria 4, Aiko 4, Stephanie 4, SheFreak 4, and The Girl 4 all work fine. When I select one of these figures either by clicking her in the scene or selecting her in the Scene Pane, her materials, poses, etc show up just fine in the Content Manager.
However, Michael 4, Hiro 4, Freak 4 and The Kids 4 have the Actor selection greyed out (in the drop-down box of the Content Manager) and says "No Selection", thereby showing no content for them in the Content Manager.
I can load the figures through the Content Manager, but once loaded they are not showing as a selection. Make sense? I set up the metadata exactly the same as I did for the Victoria characters, but they are not working like the girls do.
I have removed the metadata, uninstalled, reinstalled, etc for these characters, and I have used the Content DB Maintenance to remove invalid paths, but to no avail.
Do I have outdated/bad files? These figures are no longer free, so I don't know what to do. I like the Content Manager and want to use it for all my figures. I know about using the File Manager, but don't want to go that way if I can help it.
I have also stopped and started the Content Management Service, so that isn't the problem.
I tried searching the forum and the knowledge base, but no luck. Any help would be great.
Brian
↧
↧
Problem with transfer utitlity
I'm trying to use the transfer utility to create a conforming clothing for Genesis. When I import the OBJ to Daz, it doesn't come in centered, so I have to reposition the object so that it fits genesis correctly. After that, I use the transfer utility and everything works the way it should, except the object reverts back to it's original position. It's still conformed to the Genesis figure, it just doesn't fit into place. Anyone know what's going on?
↧
DAZ 4.9.3.166 Degradation of iRay
Hi folks,
I was really happy, that some demanding (related to surface details) scenes stopped crashing upgrading from 4.7 -> 4.8 -> 4.9.2.70 -> 4.9.3.166.
But now I used an asset with tires. To show the real 3dimensional structure of the profile, it was necessary to apply some Displacement Dub-D. With DAZ 4.9.2.70 that worked pretty well to show the details.
Now I tried exactly the same with 4.9.3.166. -> Desaterous !!!
As we all know, there are some situations, where we need way more as only bump/normal. Up to 4.9.2 Displacement worked very well.
In the current test Displacement SubD is set to 4. Rendering with 4.9.2 you see the well defined profile. For 4.9.3 there is only a smll hint of what the structure could be.
And even worse: Increasing of Displacement SubD didn't show any improvement. Contrary - even Displacement SubD = 2 shows exactly the same resolution. With SubD=0 the tires are without any surface detail (asolutely round and smooth).
I just was on my way to upgrade to 4.9.3. But luckyly I stopped really in time. 
Hello Folks / DAZ-Devs: Here really is a construction site !!
↧
Grid disappears
Hi all; When I start DS, the grid shows, then all the sudden diappears. Is there a fix for that? Thanks
↧
DS Lagging when I have any tool selected beyond "arrow"
It started 2 weeks ago, in DS 4.8. If I select the pose tool or rotate tool or xyz tool, etc. it started lagging between every movement, for seconds to up to a minute a time.
So, I installed 4.9 to see if that would do better, but it has the sames issues. I have over 100 GB free on my HD, and 12 GB RAM
Any suggestions?
↧
↧
Iray Preview not showing scene as it renders
I have a simple scene with a few primitives inside of a big box, and I am playing with emissive surfaces to provide light, experimenting with different settings. When I render the scene with Iray, the results I get are as expected, but the Iray preview looks very different. Why is this, are there settings that affect the preview differently from the actual render?
↧
How do I delete an animation Time Line?
I am working with dynamic cloth and attempting to save a piece of cloth/clothing in the final stage of a timeline so that I can then use the VWD Pythin Script with DS Bridge to move hair into a 'dynamic' pose.
What I am having trouble with is understanding how to run a timeline from default pose to a set pose to posiiton the dynamic cloth in the final posed position and then save it as a final posed piece of cloth or morph. ONce I can do this I will then work on the hair......but how do I save the final stage of the cloth as a mor[h for the pose?
↧
V4.2 and M4 not working in 4.9?
Anyone else having problems with Victoria 4.2 and Michael 4 in the new 4.9 beta?
I've used the new connect system and everything else has installed correctly so far except for these two, each time the actor stays as the daz logo with a warning triangle and if I click on it it says the file does not exist.
I've deleted and reloaded the files a couple of time now incase I had a corrupt download but no go each time.
Any ideas on how to solve this? I've got everything installing to a new directory on my second drive if that makes any difference.
↧


